How to Make a Weatherproof Cable Splice
As anyone involved in the field installation of sensors can confirm, there are times when a diversion from the original plan must be followed. In many instances a sensor’s cable length can be a direct cause or effect of this diversion. In an ideal world, a sensor’s cable will resist aging, repel nature’s most persistent rodents, and always be just long enough to reach any controller. Without further comment on an ideal world, the following will provide details on a tried and true method for making a secure, weatherproof splice, should the need arise.
Supplies needed:
- Wire Cutters / Wire Strippers
- Heat Gun
- Solder Sleeve (size dependent on wire diameter being spliced)
- Polyolefin Adhesive-Lined Heat Shrink (size dependent on cable or connector being spliced)
- Solder Iron (recommended)
- Solder (recommended)
Follow these links to purchase one of Apogee's 3 Conductor Splice Kits or 6 Conductor Splice Kits.
Procedure:
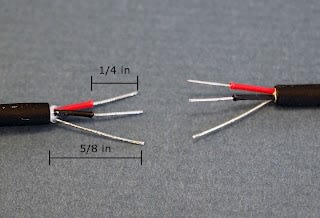
Step 1: Strip outer cable insulation 5/8”, while stripping and tinning the individual wires 1/4". NOTE: tinning the individual lead wire helps to eliminate cold solder joints by cleaning the individual strands and allowing solder to flow more freely.
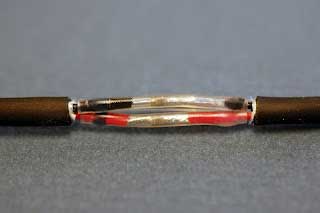
Step 2: Slide the solder sleeves onto the wires making sure the tinned ends are inside the solder rings. NOTE: depending on the location of the cable splice, you may need to slide the outer heat shrink that you will be using onto the cable now, before soldering the wires together (see Step 5).

Step 3: Slide the cable that is to be spliced into the other end of the solder sleeve making sure the tinned ends are inside the solder ring. Verify that the wires are matched to the correct wires from the sensor (e.g., red-red, black-black, and so on).

Step 4: Heat the solder sleeves using a heat gun until the solder flows. Remove heat and be careful not to pull on cable and individual wires until the solder is set.
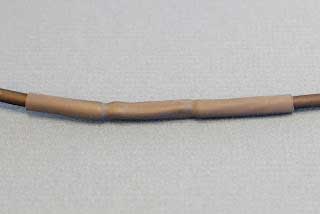
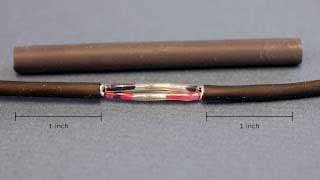
Step 5: Cover the junction with a polyolefin adhesive-lined heat shrink. This will seal the splice from the elements. Allow 1” on the outer jacket of cable to ensure a good seal. Use heat gun and notice the heat shrink forming tightly to the cable and splice. The adhesive-lined heat shrink will have a glossy look to it once the glue has flowed. Be careful not to overheat the heat shrink, and allow it to cool completely before moving.
Step 6: There may be a small amount of adhesive coming from the heat shrink ends. This is normal. When done properly, a cable splice can be just as weatherproof as the cable jacket itself. In fact, we use Atum brand heat shrink and have conducted tests showing that it is at least as impermeable to water ingress as the cable’s Santoprene jacket. NOTE: unless otherwise noted, adhesive-line heat shrink has a difficult time adhering to Teflon cable, also known as Polytetrafluoroethylene (PTFE).