The tower has two main modes of operation: manual and automatic. Ensure the tower is always connected to power with the included 5 V power adapter and USB cable.
Manual Mode
Manual mode allows the user to manually cycle through 5 predetermined display states. This allows you to choose the color and lighting of your tower, regardless of the color currently displayed on the actual Old Main tower on campus.
Quickly press the button to cycle through the 5 static display states:
1. Middle tower lights ON with WHITE A's
2. Middle tower lights ON with BLUE A's
3. Middle tower lights OFF with WHITE A's
4. Middle tower lights OFF with BLUE A's
5. All lights OFF
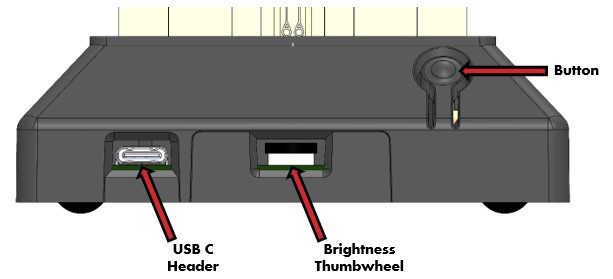
Manual mode can be entered at any point by simply pressing the button on the tower base (see diagram in Input/Output section of this webpage).
Automatic Mode
Automatic mode is necessary to synchronize your tower to the actual Old Main tower. This works by connecting your replica tower to an internet connection through a local Wi-Fi network. Please note the unit can only connect to a 2.4 gigahertz WIFI network.
Configure Network Connection
1. Hold the button for 10 seconds to enter setup mode. The roof A lights will repeatedly flash blue to indicate the tower is broadcasting a signal to a setup network that you will use to connect your device.
2. Using a Wi-Fi enabled device like your laptop or phone, open your settings, and go to the the page that shows the available internet connections. Select the network named “minitower XX:XX” (the X’s denote letters and numbers unique to your tower).
If a screen pops up after you select your minitower Wi-Fi that says that says it doesn’t have a network connection, you may select “always connect” and continue to the next step.
If you see multiple “minitower” networks, someone nearby may be connecting their tower as well. Press the button on your tower to take it out of pairing mode, and then hold the button for 10 seconds again. Watch to see which network name disappears and reappears on your device because that will be the one you want to connect to.
3. Your laptop or phone might have a page pop up or receive a notification to sign into the Wi-Fi network for the minitower. Clicking on that notification will take you to the network configuration page. Alternatively, you can open a browser on your newly connected device (like Chrome, Microsoft Edge, Firefox, or Safari). You should automatically be redirected to the network configuration page. If not, type "old-main/" in the address bar, which will take you to the needed page.
4. Fill out the fields on the configuration page:
4a) The first field on this page will be a drop-down list. Select the name of the Wi-Fi to which you want to connect your tower (must be a 2.4 gigahertz network). For example, if you are setting up your tower in your living room, select the Wi-Fi network that you use at home.
4b) In the next field, input your Wi-Fi password.
5. Submit the information. The tower will attempt to connect to the network. If successful, the A lights will flash white and then assume automatic operation according to the matching style you selected. If unsuccessful, the A lights will blink white until it is connected. If it doesn’t connect after 5 minutes, repeat the process, making sure the Wi-Fi password you input is correct. If it still doesn’t connect, call (XXX)XXX-XXXX.
After successfully connecting, you can switch back and forth between automatic mode and manual mode at any point by pressing and holding the button on the base for at least two seconds. Pressing and holding the button for longer than 10 seconds will initiate setup mode again and allow you to reconnect or connect the tower to a new Wi-Fi by following the steps above.
Access the complete product manual for product specifications and more information.
View USU’s Light the ‘A’ Blue webpage to find out what color the A is currently on USU's Old Main Tower and why.