Turn an Android Device into a Meter
Recommended App: Serial USB Terminal
What you need:
- USB-C to USB adapter,
- AC-421 SDI-12 Converter,
- Android device with the serial USB terminal app
- Any Apogee SDI-12 sensor
In this tutorial, we will cover how to use a 3rd party serial interfacing app to turn your device into a meter for your SDI-12 sensor. The sensor used in this tutorial is the SQ-521. While this example only uses one sensor, this software should be able to take multiple sensors' readings at once, as long as each sensor has a different address.
- To begin, download the serial USB terminal app to your Android device.
- Plug in your USB-C to USB adapter to your device with the SDI-12 converter attached. The dataline, ground, and voltage wires of your SDI-12 sensor should be connected to the converter.
- Connect your SDI-12 converter to the app. This can be done two ways:
Connecting Converter to App
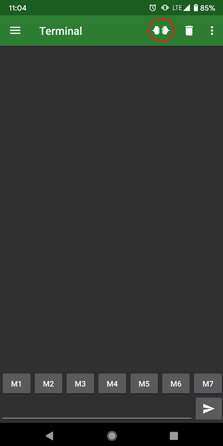
- You can connect to the app using the button in the upper right-hand corner, highlighted here:

- When prompted to “allow serial USB terminal to access sensor interface”, click OK. Your SDI-12 Converter will be connected to your device.
- You can also connect via the App's Menu.
- Click the three lines in the upper left-hand corner to open the menu. The menu should look something like this:

- Click “USB devices”
- If this is your first time loading the AC-421 to your device, it should be displayed as:

- Click on the device and set its driver to CDC
- It should now appear as such in your USB Devices:

- Click the three lines in the upper left-hand corner to open the menu. The menu should look something like this:
- You can connect to the app using the button in the upper right-hand corner, highlighted here:
Setting Up the App
- In the menu, navigate to ”settings”
- Your Serial settings should look like the following:

- Your Terminal settings can be modified to your preference; we used the following default settings:

- Your Receive line should not make much of a difference, we have ours set to the default CR+LF
- Your Send line will need to be changed. To avoid data communication errors, change your Newline setting to None
- You will also want to add a Line Delay to your sensor. We recommend delay of 1000 ms.
- Your Send settings should look something like this:

- Your Miscellaneous page will remain unchanged
You are now set to use your sensor with SDI-12 commands!
Navigating the App
- Try pressing and holding over M1 on the Terminal Screen. You can now edit a Macro to send you your sensor's address.
- Enter ?! into the Value box and name the macro whatever you like! Your page will look something like this:

- By pressing your macro or simply typing ?!, you will receive the address of your device. Using your address, you can now take a spot measurement with your device.
- To take a spot measurement, enter the command aM! where "a" is the address you just generated. The aM! command will ask your sensor to take a reading.
- To display the reading to your device, you will enter the command 0D0!
- This tells your sensor to output the reading to your device.
- You can turn this into a Macro, letting you take readings on your device with the press of a button. An example of this would look like:

- The value next to ?! is your address, and the value next to 0D0! is your PPFD reading.
- All SDI-12 inputs will work a similar way, so you can also read Voltage, Angle, and more all through your device!
Contact Us!
If you have any comments, questions, or concerns, please contact our Tech Support line by email or device at:
Email: TechSupport@apogeeinstruments.com
Main Line: (435) 792-4700
We are available Monday-Friday 8am-5pm MST.
