Legacy Quantum Sensor Software Support
These update instructions are for SQ-420 Sensors with a serial number less than 1258. Please note this refers to very old sensors purchased prior to March 2016. All of the newest sensors are labeled SQ-420X.
If your sensor is no longer working after an automatic update, click here >
Click here for BTM300 update instructions >
SQ-420 Update Instructions (Serial Number less than 1258):
Steps performed: Uninstall the old software, install the new software, update the sensor firmware. If needed uninstall the HDI device and install a new driver.
Important things to know before beginning update process:
- The sensor firmware can only be updated on a Windows based PC or tablet, after updating it will work on both Windows and Mac.
- After installing the new software, in order to update the firmware, the sensor needs to be plugged in BEFORE the newly installed software is opened for the firmware update prompt to appear.
- Please write down your calibrated multiplier and offset before updating the firmware. This can be found by plugging in your sensor, opening the current software, and navigating to the calibration window. If you don’t have a previously installed copy of the software, do not worry about writing this information down.
Update Instructions:
Step 1: Download the ApogeeConnect setup file to your computer, this should default to your downloads folder. Click here to get the latest software version >
Step 2: If you can, uninstall you current USB quantum software using the control panel, it should be named “SQ420.”
Step 3: Run the downloaded setup file (from Step 1) to install the new software, following the prompts.
Step 4: If the software is open after installation, close the software, then plug in your SQ-420 sensor.
Step 5: Start the software, which will result in a pop-up window prompting you to update the firmware in your sensor, please do so. *Select the SQ420_V2.txt from the file dialog box. (Note, for sensors with a serial number greater than 1258 should the latest version. As of Feb. 2nd, 2017 this is SQ420_V7.txt.)
*If your computer says USB Device not recognized you need to install drivers
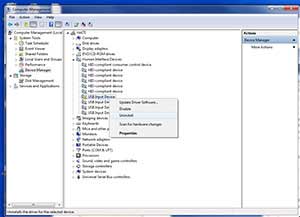
Please open your device manager, which should have a com port device “SQ-420” with a yellow box and an “!.” If this is not present, please unplug your sensor for 3 seconds, then reconnect. Right click this device and select “Update Driver Software,” then “Browse my computer for driver software.” Navigate to the ApogeeConnect folder, then the select the “driverlib” folder. Click next, and the driver should install properly.
Step 6: Start the ApogeeConnect software and enter the 4 digit serial number of your sensor into the pop-up window (found on the white label 6-12” from the USB plug). The sensor should begin working in a few seconds, and the “Device Connected” indicator will turn green and show the serial number.
NOTE: To use additional devices, open a second ApogeeConnect software window, plug in the additional sensor, and enter the serial number into the prompt.
If you are experiencing any difficulties with these instructions or your sensor is still not making measurements, please contact techsupport@apogeeinstruments.com.
If you experience problems with Apogee software, please fill out this form so our engineers can address the issue as soon as possible.
These update instructions are for SQ-420 Sensors that are no longer working after an automatic update:
Step 1: Starting with your sensor connected and the software open, navigate to the calibration window using the gear icon on the bottom left of the screen.
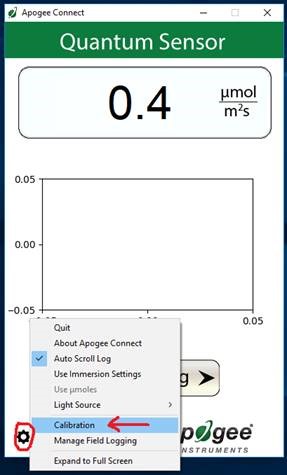
Step 2: Type "FACTORY" into the Multiplier field and press the enter/return key on your keyboard. The calibration factor will reappear and the greyed out "Update Firmware" button will become available.

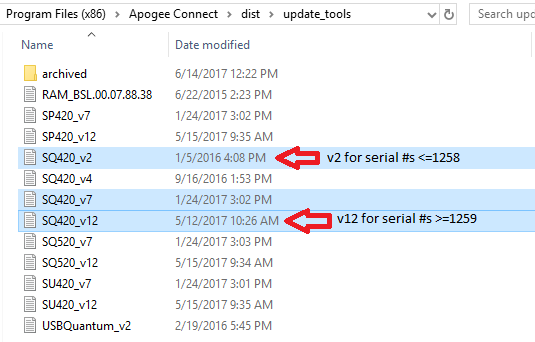
Step 3: Click "Update Firmware" button. A file selection window should open. Firmware files are located in the directory location where Apogee Connect is installed (on our machine, this is: C: Program Files (x86)\Apogee Connect\dist\update_tools). If the serial number of you SQ-420 is 1258 or below, select the "SQ420_V2.txt" from this directory location. If your serial number is 1259 or higher, select "SQ420_v12.txt", and follow the prompts. (Note that if you install v12 are still having trouble after completing these steps, go back through and try v7)
Step 4: Firmware is now updated and sensor should be working correctly.
These update instructions are for BTM3000 Sensors with a serial number less than 1430.Click here to update SQ-420 >
BTM3000 Update Instructions (Serial Number less than 1430):
BTM 3000 Software & Firmware Update Instructions
Steps performed: Uninstall the old software, install the new software, update the sensor firmware, install the new driver, set offset to zero.
Important things to know before beginning update process:
- The sensor firmware can only be updated on a Windows based PC or tablet, after updating it will work on both Windows and Mac.
- After installing the new software, in order to update the firmware, the sensor needs to be plugged in BEFORE the newly installed software is opened for the firmware update prompt to appear.
- Please write down your calibrated multiplier and offset before updating the firmware. This can be found by plugging in your sensor, opening the original BTM3000 software, and navigating to the calibration window in the “Actions” drop-down. If you don’t have a previously installed copy of the software, do not worry about writing this information down.
Update Instructions:
Step 1: Download the BTM3000 setup file to your computer, this should default to your downloads folder. Click here to get the latest software version >
Step 2: If needed: Uninstall the original software using the control panel, it should be named “BTM3000.”
Step 3: Run the downloaded setup file (from Step 1) to install the new software. During the installation you will be prompted to install a driver, please do not install the driver.
3b. If the new driver was installed previously or on accident, please follow these steps to remove it: Navigate to your device manager, expand the "Port: COM & LPT" section, right click and uninstall the sensor, making sure to check the box to remove the driver from the computer, and finally disconnect and reconnect your sensor.
Step 4: If the software is open after installation, close the software, then plug in your BTM3000 sensor.
Step 5: Start the software, which will result in a pop-up window prompting you to update the firmware in your sensor, please do so. A file selection window should open for your to select your firmware, please select "USBQuantum_v2.txt" from the file dialog box.
NOTE: On some system configurations the first firmware update attempt does not open this window and appears to update the sensor, which prompts you to disconnect and reconnect your sensor. Please disconnect your sensor, close the BTM3000 software, The second attempt will open the file selection window and the update will be successful.
Step 6: The new driver now needs to be installed in order to connect your sensor. There are two methods to do this:
Option 1 (Our preferred method): Navigate to the Device Manager, expand the "Ports: COM & LPT" section, right click the device (it will show up as USB Serial Device or something similar, if you are unsure which device it is, disconnect your sensor and watch the list as you reconnect it), click Update Driver Software, select browse my computer, and navigate to the folder containing the drivers. Windows takes care of the rest.
Option 2: The driver file is located in the “driverlib” sub-folder in the installed BTM3000 folder; “C:\Program Files (x86)\BTM3000\driverlib” is the default path for Windows 7 & 10. To install the driver onto your computer, open the driver installation wizard "dpinst.exe" (see highlighted below). It should take about 10 seconds to install the driver to your computer (note: it has not yet been associated with your sensor).

Unplug your sensor, wait 3 seconds, plug in your sensor. The device driver software should attempt to automatically install, with a notification in the bottom right.
If this doesn't happen or is unsuccessful you can manually associate the sensor with the driver. To do so, navigate to the device manager, which should have a COM port device with a yellow box and an “!.” If this is not present, please unplug your sensor for 3 seconds, then reconnect. Right click this device and select “Update Driver Software,” then “Browse my computer for driver software.” Navigate to the BTM3000 folder, then the select the “driverlib” folder. Click next, and the driver should install properly.
Step 7: Start the BTM3000 software and enter the 4 digit serial number of your sensor into the pop-up window (found on the white label, approximately 6-12” from the USB plug). The sensor should be connected in a few seconds. A “Device Connected” indicator at the bottom of the software will turn blue and show the serial number. The reading displayed should be stuck at zero regardless of the amount of light on the sensor, proceed to step 11. If your reading displayed is frozen at a large value in the 4000 or 5000 range, you accidentally installed the wrong firmware, please see step 12 below.
Step 8: **CRITICAL FINAL STEP** The offset from the original calibration must be reset to start making measurements. Navigate to the calibration window using the gear icon in the bottom left. Erase the number value in the multiplier field, type “FACTORY” into the field and press the enter/return key on your keyboard (the calibration factor will reappear and the greyed out section below will become available). Being careful to not change the calibration factor, change the offset to 0.0, check the box to overwrite the factory calibration, and click save. The displayed reading should now be reading properly. Office lights are typically 7-15 PAR, in-tank measurements are typically between 50 and 400 PAR.
You're all done, thank you for updating your sensor!
If you are experiencing any difficulties with these instructions or your sensor is still not making measurements, please contact techsupport@apogeeinstruments.com. If you experience problems with Apogee software, please fill out this form so our engineers can address the issue as soon as possible.
Step 9: This step is only needed if your sensor is stuck reading a high PAR value in the 4000 or 5000 range (this happens when the wrong firmware version is installed).
Starting with your sensor connected and the software open, navigate to the calibration window using the gear icon on the bottom left of the screen. Type “FACTORY” into the field and press the enter/return key on your keyboard (the calibration factor will reappear and the greyed out section below will become available). Click "Update Firmware" button. A file selection window should open, please select the file "USB_Quantum_V2.txt" and follow the prompts. If the displayed reading is now stuck at zero you need to complete Step 8.